There's a ton of cleaning and preparation involved in readying your home for resale. When you have pets, there are some extra steps you need to take to make sure your home is ready to be shown to prospective buyers. If you’re reselling without renovation—new carpets, wood flooring, etc.—you want to make sure you make your home as presentable as possible to help buyers envision themselves in it. What time and money should you invest to de-pet your home?
Walls and Doors
A clean freshly painted house goes a long way toward helping your home sale. Before you try to cover up any damage with a coat of paint, think again. Smart buyers look for damage all over the house and will see your feeble attempt at a cover-up as evidence that the home hasn't been taken care of. You will lose interest from excellent potential buyers who think the house likely has hidden issues that will crop up later. Take the time to fill in scratches and gashes to create a clean surface before painting. Check your walls, door frames, doors, and cabinetry for pet damage and mark all the areas that need attention, so you can get to work.
- First, start sanding. Using a sanding block or heavy grit sandpaper go over each area of damage to buff out the surface and make it as smooth as possible. If there are doors or door frames you want to stain instead of paint, it is especially necessary to take the time to minimize significant damage.
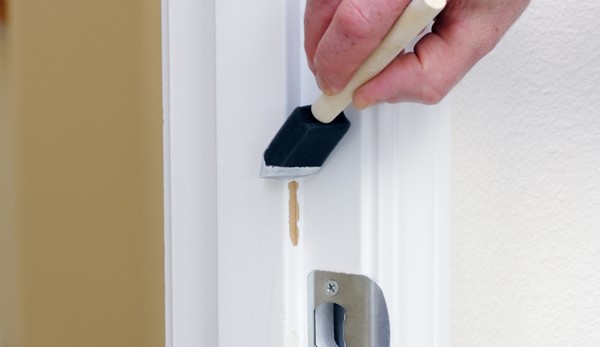
- Second, for areas that you will paint take spackle and fill in any gashes that you couldn't buff out all the way. Remember to let the spackle dry before your second round of sanding. Try using a blow dryer to hurry up the drying process, but it is always best to let the spackle dry naturally, to the time listed on the instructions, if you can spare the time. Don’t over spackle and make the drying and cleanup process longer for yourself. Just fill in the holes as needed using as little spackle as possible. When applying the spackle make sure you’re extending the coverage space slightly with each pass blending the repaired part with the rest of the surface you're restoring.
- Third, go over all the spackled areas with sandpaper again. You can start with the coarse paper and move to a less coarse paper for final smoothing. When you're satisfied that the gashes have filled and the surface is level you’re ready to clean and paint.
- Fourth, clean all surfaces with a damp cloth and clean up all dust and debris from the floor. Clean the entire wall or surface you’re going to paint so you can best gauge color match results. If you’re not painting the whole wall or door and are just going to touch up around the repair, you'll want to make sure the paint blends as well as possible. If a lot of sunlight hits the surface, your paint has probably faded a bit, and your new touch up could be glaring.
- Fifth (and last), paint. For best results prime the wall before you paint. Once your primer dries, you're ready to apply paint. Start with light coats and as with the spackle slowly fade the paint out from the repair over the rest of the surface. Let the first coat dry and check your color matching. If the repaired area is too glaring, consider painting the entire wall, door or cabinet for best results. Note: just because you repaint a bedroom wall doesn’t mean you have to repaint all of them. If you’re painting with the same color that is already on the walls the overall difference from one wall to the other won’t be noticeable if you paint the whole wall, instead of one spot alone.
With walls, door, and doorframes done, you're ready to move onto carpet and wood flooring. Check out part 2 and 3 of this series for more tips and instructions.
If you’re reselling and aren’t sure what repairs to make before selling ask your real estate agent for advice on where to invest your time and money before resale.
About the Author
